
Viewing Article
 | Jan 7 2011, 2:59 AM |

Below are the instructions on how to change the LAN IP Range on your Sharedband Netgear Routers.
This will need to be done on ALL Sharedband Routers.
Step 1
Log onto the web interface (http://192.168.3.x - where x is the node number usually hand-marked underneath). The username is always admin and the case-sensitive password is by default either password or Bonding123
Step 2
Click 'Network Settings' (under advanced)

Update the 'IP Address' (and also the 'Subnet Mask' and 'DHCP Range' if required), then click 'Apply', the router will then ask for a reboot (click reboot).
Step 3
Once the router has rebooted, Login to the router on it's new IP (you may need to update your IP manually or with a DHCP release & renew), click 'Configuration' (under Sharedband).

Change the 'Virtual router address' to be in the new Subnet you have used in Step 2, Make sure you use the same IP on every router for the Virtual Router Address, then click 'Save', the router will then ask for a reboot (click reboot).
Sharedband uses VRRP to provide a common default gateway IP for the network. If one of your Sharedband routers fails then another router will automatically bring up the VRRP IP address and everything continues to work without changing the configuration on your network equipment.
You will need to configure your equipment to use the VRRP address as the default gateway or change the VRRP address to match your old default gateway.
The VRRP address needs to be the same on all Sharedband routers.
Step 4
Repeat steps 1 - 3 for each Sharedband Router. When complete, all routers will now be on the new IP Range. if you get any issue's please Raise A Ticket.
Below are the instructions on how to change the LAN IP Range on your Sharedband TP-Link TD-W8968 Routers.
This will need to be done on ALL Sharedband Routers.
Step 1
Log onto the web interface (http://192.168.3.x - where x is the node number usually marked underneath). The username is always admin and the case-sensitive password is by default either password or Bonding123
Step 2
Click 'LAN’ (under Advanced Setup)
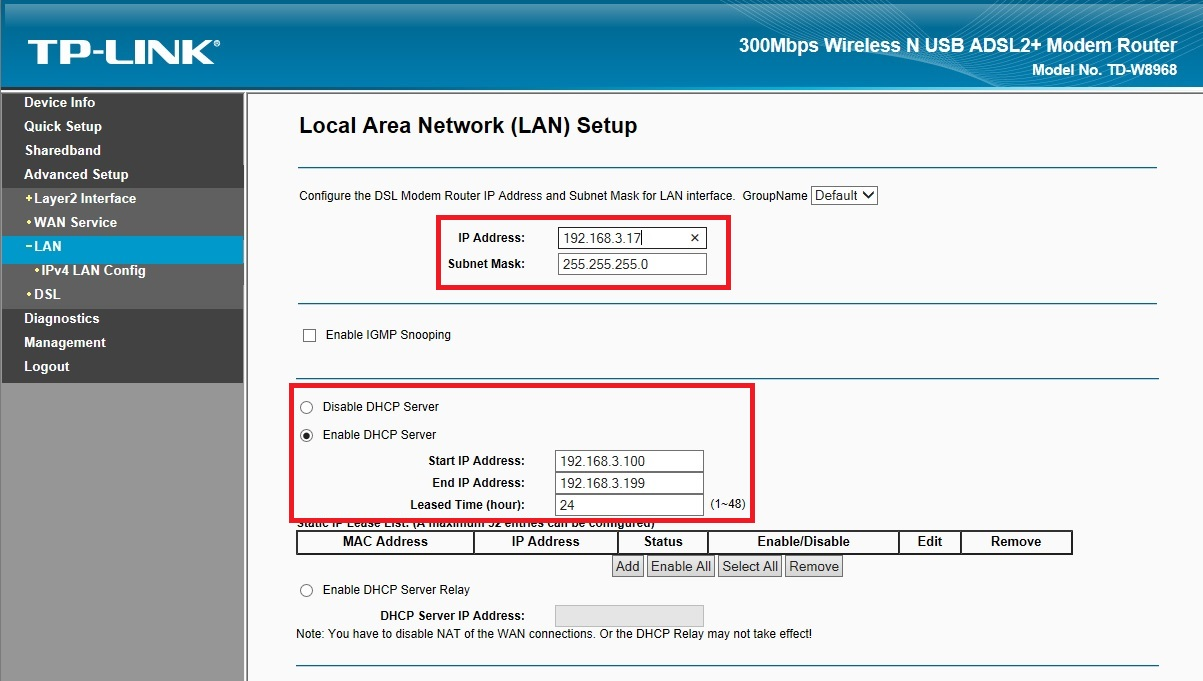
Update the 'IP Address' (and also the 'Subnet Mask' and 'DHCP Range' if required), then click 'Save and Reboot'.
Step 3
Once the router has rebooted, Login to the router on it's new IP (you may need to update your IP manually or with a DHCP release & renew), click 'Configuration' (under Sharedband).
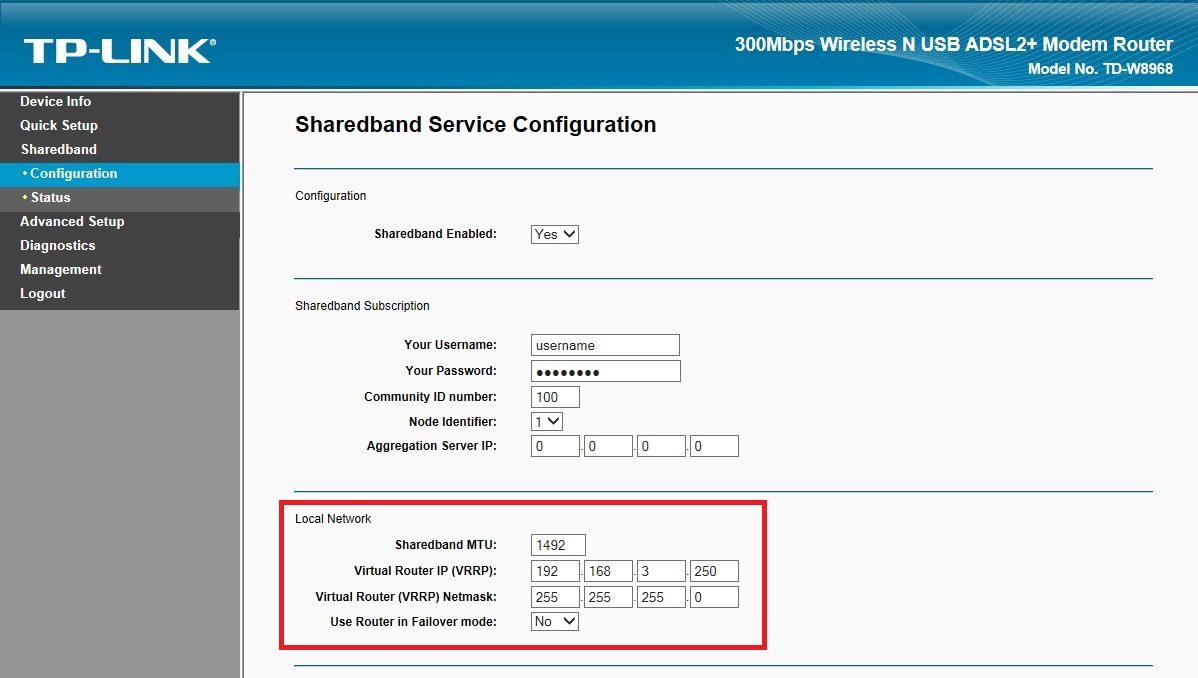
Change the 'Virtual router address' to be in the new Subnet you have used in Step 2, Make sure you use the same IP on every router for the Virtual Router Address, then click 'Save', the router will then ask for a reboot (click reboot).
Sharedband uses VRRP to provide a common default gateway IP for the network. If one of your Sharedband routers fails then another router will automatically bring up the VRRP IP address and everything continues to work without changing the configuration on your network equipment.
You will need to configure your equipment to use the VRRP address as the default gateway or change the VRRP address to match your old default gateway.
The VRRP address needs to be the same on all Sharedband routers.
Step 4
Repeat steps 1 - 3 for each Sharedband Router. When complete, all routers will now be on the new IP Range. if you get any issue's please Raise A Ticket.
Below are the instructions on how to change the LAN IP Range on your Sharedband TP-Link TL-WDR3600, Linksys WRT54GL. TP-Link WDR3600, TP-Link WR1043NDv3, TP-Link WR1043NDv3 MultiWAN, Power Router, Power Router Pro, Power Router 1, Power Router 2 and Power Router 2+ routers
This will need to be done on ALL Sharedband Routers.
Step 1
Log onto the web interface (http://192.168.3.x - where x is the node number usually marked underneath). The username is always admin and the case-sensitive password is by default either password or Bonding123
Step 2
Click 'LAN settings’ (under Settings)
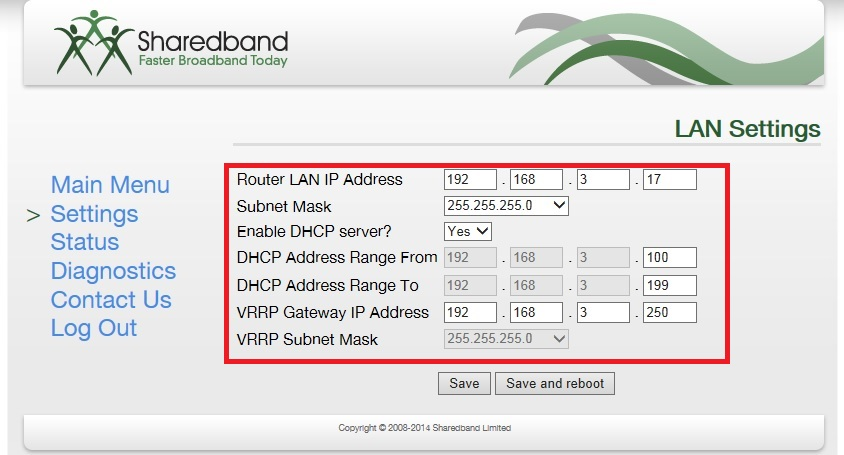
Update the 'IP Address' (and also the 'Subnet Mask' and 'DHCP Range' if required), Change the 'Virtual router address' to be in the new Subnet then click 'Save and Reboot'.
Sharedband uses VRRP to provide a common default gateway IP for the network. If one of your Sharedband routers fails then another router will automatically bring up the VRRP IP address and everything continues to work without changing the configuration on your network equipment.
You will need to configure your equipment to use the VRRP address as the default gateway or change the VRRP address to match your old default gateway.
The VRRP address needs to be the same on all Sharedband routers.
Step 3
Repeat steps 1 - 2 for each Sharedband Router. When complete, all routers will now be on the new IP Range. if you get any issue's please Raise A Ticket.